Teensy Based Synthesizer
I play bass guitar, but never really understood much music theory or honestly which note corresponded with each fret. In an effort to rectify this, I printed off some sheet music from a composer I enjoy and decided I would force myself to learn the songs only through sheet music; I still remembered every-good-boy-does-fine and FACE from 3rd grade, I could find C on a piano, and I knew each key was a half step. This also opened up the world of synthesizers. No longer did I have to rely on a pre-built instrument to make a waveform and be stuck with modifying it.
This requires a MIDI controller. These look like a piano with the same keys, but instead of producing sound, they produce data like what note was pressed, how hard it was pressed, when a key is released, etc. This data is packetized and sent through a 5-pin MIDI cable (or just a USB) to any device that can read the data. The cheapest option to get some sound is to find a free software-synth for your computer. This worked for me and helped me learn several songs while getting pretty close the actual sound used in the piece.
However, there's a part of me that feels like this is cheating a little. It's almost too easy. To remedy this, we can use a Teensy microcontroller and the Teensy Audio Library to create a sort of hardware synth. The Teensy is able to process the MIDI messages and use them to trigger oscillators. The MIDI protocol also includes data packets for controls like knobs, pitch-bend wheels, etc. We can use these to control the synth parameters to avoid also building hardware controls into the actual synth.
With all this information, the plan is to slap a Teensy Audio Shield onto a Teensy 4.0 and put it into a nice enclosure with a battery system (the keyboard I have draws power through the ). The input will be a USB port from the MIDI keyboard. The output will be a regular headphone jack. We also need a charging port for the battery. After building the core functionality of the synthesizer, I will add a screen to make the whole system a little more usable.
Here is the flowgraph that I will be using for this project. This was made using the Teensy Audio Library GUI. This tool allows you to visualize the path the audio signals will take through the various objects. It will also generate the Arduino code necessary to create these objects and their connections on the microcontroller.
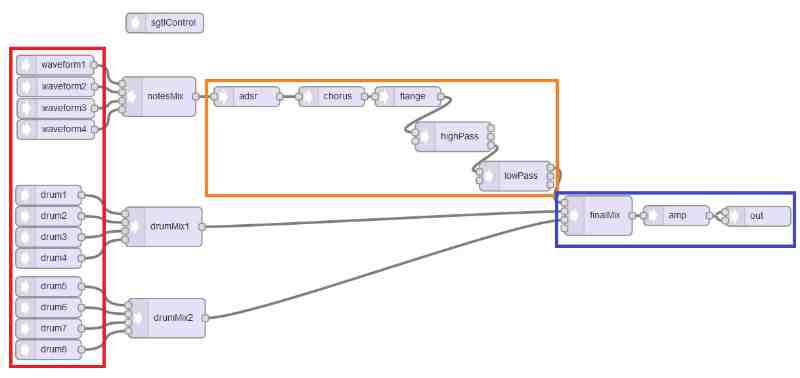
In the red are the oscillators. These are what create the initial signals to be processed. At the top are the 4 waveform oscillators, which are used for the regular keys on a piano. Note that each oscillator can only make 1 note at a time, so this will be a 4-voice synthesizer. My 25-key keyboard doesn't really allow for 2-handed playing so 4-voices should be enough. I have put in 8 drum oscillators since I have 8 pads. I plan to hard-code the parameters for these.
In the orange, we have the effects that can be applied to the signals. ADSR stand for Attack, Decay, Sustain, Release. This describes how the sound changes when a key is pressed and released. Attack defines how long a note takes to reach peak volume once a key is pressed. After reaching that volume, the note "decays" in volume until it reaches the sustain level. Once the key is released, the note "releases" back to silence. A, D, and R are time-based parameters while S is a volume. The chorus effect simply plays the same signal that is received, but with a slight offset. This emulates multiple instruments playing the same part and can help make the sound more full. The flange effect is there because I put in in a guitar pedal and it sounded awesome. And we finish off the effect chain with the required high and low pass filters.
The last section is the output stage. The mixers collect all the signals together in order to provide a single output and the amp object provides volume control. The headphone jack on the audio board has a built in volume adjustment system, but the line out does not.
The sgtlControl object provides control over the audio board itself.
for (int i = 0; i < NUM_OSCILLATORS; i++) {

// if the note is a duplicate, don't add another
if (oscNotes[i] == (int)note) return;

if (oscNotes[i] == 0) {
    oscNotes[i] = (int)note;
    noteIndex = i;
    break;
}
}

switch(noteIndex){
case 0:
    waveform0.begin(1.0, MIDI_to_freq[(int)note], WAVEFORM_SINE);
    break;
case 1:
    waveform1.begin(1.0, MIDI_to_freq[(int)note], WAVEFORM_SINE);
    break;
case 2:
    waveform2.begin(1.0, MIDI_to_freq[(int)note], WAVEFORM_SINE);
    break;
case 3:
    waveform3.begin(1.0, MIDI_to_freq[(int)note], WAVEFORM_SINE);
    break;
default:
    break;
}
The Teensy board includes a MIDI library that we will use to process the incoming MIDI messages. This is done by creating our own functions to handle the messages we are concerned with. MIDI includes many messages that we won't deal with like system reset and tune request. The core of the synth wll be noteOn and noteOff messages. Above is the code for noteOn. This is called when a new key is pressed. First, we check if the number of notes being played has exceeded the number of oscillators available. If so, nothing happens. If we have an oscillator available, then we move on to figure out which one it is. I made an array to keep track of what note each oscillator is playing. A value of 0 means it is off. When a message is received, this array is checked to see if there are any free oscillators.
If there is, it's corresponding array value is updated, and the index is copied. This is used in a switch-case statement to actually modify the oscillator. At the start of this process we checked if any oscillators are active. If there are not, then this is the first note and the ADSR should be started.
MIDI notes are int values. They range from 0 to 127. 21 is A0 so MIDI can go lower than a normal piano. The frequency that goes with each MIDI note is stored in an array such that the MIDI note can be used as the index to find the frequency that goes with it. 0 is a valid note, but since I'm using that as the off state for the oscillators, this synth will not be able to play a C-1 at 8.175Hz. During setup, an array is populated to act as a lookup table rather than calculating the frequency each time.
MIDI_to_freq[i] = pow(2.0, (float)(i-69)/12.0) * (float)440;
The noteOff function looks very similar. The MIDI message has a note in it, so we look for the oscillator that matches this note. This oscillator's amplitude is set to 0, and it's entry in oscNotes is set to 0, making it available for another note.
The last thing noteOff does is check if there are any notes still being played. If there are none, then the ADSR release phase is triggered. There are 2 things to note here. 1: If a chord is played and only 1 note is released, it will not be properly "released" by the ADSR. 2: The release phase might do nothing. Since the oscillator stops, there is no input for the ADSR to release. The ADSR object may hold a sample to play in a loop during the release phase, but I am unsure. If it does not, I will have to come back and add a delay on when the oscillator actually turns off as well as giving each oscillator its own ADSR.
Once the basic MIDI handling functions were created, I uploaded the program to see if the MIDI noteOn and noteOff functions were being called correctly. Since the USB is being used for MIDI messages, I guessed that it can't be used for serial as well. To see if functions are being called, I made the onboard LED turn on when notOn is called and turn off with noteOff. A program called MIDI-OX lets me send MIDI messages from my computer, while monitoring the exact message contents, the status of devices, etc.
With everything hooked up, I started hitting keys and saw the messages being transmitted. However, the LED did not light up. I had named my handler functions "noteOn" and "noteOff" which I suspected might be messing with the MIDI library's functions. Renaming them fixed the issue and left me with a MIDI controlled LED.
The next test was a simple audio check, bypassing all effects. I modified the signal flow so the oscillator goes straight to the output. Apparently my computer's USB ports are super noisy, but notes got played. I also noticed that the sound got quieter towards the low end. MIDI 50/D3/146.83Hz was where I started noticing a lack of volume.
Normally, you plug an Arduino or Teensy into a computer to upload code and power the microcontroller. In this case, I'm plugging a device in to the Teensy to be powered. The regular USB port on the Teensy is not deisgned to provide power. You could make a circuit that injects power when you want it (MIDI controller plugged in) and not you don't (uploading code). However, the Teensy comes with a USB host capability that I'll make use of. On the smaller boards, this comes as a couple pads on the bottom that you have to solder to. Providing steady power is up to you. on the larger boards, there are through-hole pads for attaching pins. PJRC also sells a USB cable with pin sockets on one end so you can easily plug it into these USB host pins.

To get this to work with MIDI, there is a library to import: "USBHost_t36.h". We create a usb object, and use that to create a MIDI object. On each loop, we need to call MyUSB.Task() and MyMIDI.Read(). Everything else is the same.
I bought a USB host cable, audio board, plastic box, and Teensy 4.1. PJRC's website was out of most boards so this was what they had. With the extra power though, I can add more features without worrying about running out of memory or getting bottlenecked at the CPU.
