Making Snake on a Nintendo DS
13 July 2023
Download the game.
Download the source files.
I'm not going to cover nflib functions that are decently documented in the official docs. I will however cover things like libnds timers and nflib text that I don't think have enough documentation.
Basic Setup
Classes and Other Functions
Graphics
Game Logic
Displaying Text
Game-over Handler
Speedup
Final Thoughts
Resources
I started at square 1, with making a development environment. This required installing DevKitPro and nflib. I found another abstraction library you can use on top of these called SimpleNF, but I decided to stay a little closer to the hardware so I can appreciate what is actually happening in memory. Note that all nflib provided functions start with "NF_". Every other function comes from a C++ standard library or libnds.
Getting started was slow. A lot of my trouble came from being rusty on C++ and having to search for methods to return an array from a function (Don't. Just pass-by-reference and modify it directly), or figuring out if there's a list structure built in and does it let you add things to the end? (std::list<Type>, and it has the function emplace_back(arg1, arg2) where the arguments get passed to the constructor that matches the list type.)
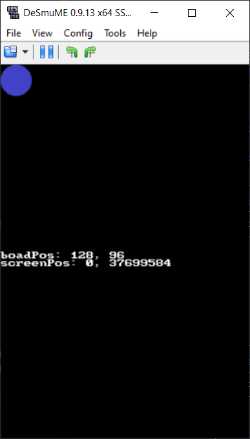
Debugging is another challenge with the DS. Reading documentation to understand what exactly is going on is pretty much required. For seeing variable values, libnds does provide a console that we can print to. After all the setup, call consleDemoInit(). You can now call printf() like in any other C/C++ program to print out whatever you need.
Normally, C++ projects structure themselves with many different .h and .c files representing each class and a very short main.cpp. I was never taught exactly how this structure works, so I'm putting everything in 1 file. It's a small game anyway. The overall structure of my code is:
classes:
Board()
Food()
BodySegment()

<global variables>

handleDeath()
update()
setupGame()
main() {
	<init graphics and systems>
	<start timer to call update()>
	<infinite loop to handle input>
}
I created 3 classes for a body segment, food, and the board. The body class holds it's position and related sprite data (gfx ID, pal slot/ID, and VRAM slot/ID). The body segments will be inserted into a list so they can be iterated over. Index 0 of this list is the head and will be treated special. The food class just holds the position of the food, a function to move it, and the basic sprite information. The board class holds the boundaries of the game field and a function to convert from board coordinates to screen coordinates.
class BodySegment {
private:
    array<int, 2> boardPos = {0, 0};
    int id, gfxID, palID = 0;
    Board board;
    int width = 4;
public:

    BodySegment(int newid, int newgfxID, int newpalID, int x, int y, Board boardRef) {
        id = newid;
        gfxID = newgfxID;
        palID = newpalID;
        boardPos[0] = x;
        boardPos[1] = y;
        board = boardRef;

        int screenPos[2];
        board.boardToScreen(boardPos[0], boardPos[1], screenPos);
        NF_CreateSprite(SCREEN, id, gfxID, palID, screenPos[0]-width, screenPos[1]-width);
    }

    ~BodySegment() NF_DeleteSprite(SCREEN, id);

    void move(int x, int y) {
        int screenPos[2];
        board.boardToScreen(x, y, screenPos);
        boardPos[0] = x;
        boardPos[1] = y;
        if (board.checkValidPos(x, y)) {
            NF_MoveSprite(SCREEN, id, screenPos[0]-width, screenPos[1]-width);
        }
    }

    int x() return boardPos[0];

    int y() return boardPos[1];
};
The board probably doesn't need to be a class/object, but it help me keep everything organized in my head, especially coming from the Unity system where absolutely everything is an object.
I also made a simple setup function that clears the list of body segments, creates the head in the center, and places the food. This can be used to restart the game after the player dies later.
At this point I wrote a skeleton game-loop function to move the head, shift all body segments to follow it, then start checking if the head position (in board coordinates) matches the position of any food or bodies. The wall collision can be simply checking if the board coordinate vales are outside of the allowed range. This will be called on a timer.
Back to making graphics, I prepped a 8 pixel by 8 pixel white square and saved it as a .bmp. From my other exploration of NDS programming, I put in my master_palette.bmp also to make sure the palette gets generated correctly. With these 2 files in the same folder as grit.exe, I opened PowerShell in the folder and ran:
.\grit.exe master_palette.bmp square.bmp -gb -gB8 -pu16 -pS -ftb -fh! -O"master.pal" -gTFF00FF
I took this from my previous notes. Looking at the documentation, some of these flags/options are the default. The documentation also encourages explicit flag setting since grit will sometimes guess what you want and could guess wrong.
This produces 3 .bin files: master.pal.bin, square.img.bin, and master_palette.img.bin. I moved all these to the project nitrofiles folder in my project, and removed the .bin extension. You might find it interesting to look at a hexdump to see how simple these files actually are.
Changing the code to import these 2 new files now shows a white square in the middle of the screen. 1.5 days to draw 8 pixels in the middle: excellent progress. This is also a good test of all the class functions and my game setup function, so this represents more than just drawing a square. While on the graphics topic, I next made a background that shows the edges of the play-field. I also made another square to represent the food. Since we have the full master palette, it's easier to just make another sprite that references a different color on that palette. The other option would be to make a different palette and reuse the sprite.
For the background, I made a 256x256 png of the board. The DS screen is only 196 pixels tall, so the bottom pixels will be cut off. Background dimensions must be divisible by 256, so you can't just make the image smaller. I'm unsure if this is a grit requirement, hardware, or other library imposing this restriction. I converted the png to a 8-bit/256 color bmp and ran grit on it, separate from the sprite bmps:
.\grit.exe board.bmp -g -gTFF00FF -m -mRtf -mLs -p -ftb
This gave me 4 files. I deleted the .h file and moved the other 3 to the nitrofiles folder, again removing the .bin extension as required by nflib.
All the required graphics are now ready to go; the only thing left was to program the game behavior. The game loop is:
- check for button presses - update direction
- move head direction
- move all bodies up 1
	- 2 pointers - new and old position
	- new = old
	- old = bodies[i]
	- bodies[i] = new
- check for wall and body collisions
- check for food collision, if yes:
	- food.move()
	- bodies.emplace_back()
I first tackled the input handler. This needed to run every frame, so it went in a the while(1) loop that also updates the OAM (display).
scanKeys();
if (KEY_LEFT & keysDown() && dir[1] != 0) {
	newDir[0] = -1;
	newDir[1] = 0;
}
scanKeys() updates all the input registers and keysDown() gets the status of any buttons being held down from those registers. This returns a series of bits represented each key's state. The KEY_LEFT constant provided by libnds is a mask that gets the left d-pad. So if the left d-pad is pressed, and the snake is currently going up (0, -1) or down (0, 1), a buffer variable is set to left (-1, 0). The NDS is weird in that screen y-coordinates are reversed (0 is at the top), so -1 in the y means moving up. A similar check occurs for the other directions.
The update() function contains all the game logic. Since things only change when the snake moves and it moves in steps, this saves some processing power. This is accomplished by using the NDS timers, with help from libnds.
timerStart(0, ClockDivider_1024, TIMER_FREQ_1024(timerVals[difficulty]), update);
timerVals[difficulty] resolves to int values (2, 3, 4, 6, ...) that will make the game run faster as difficulty is incremented. This line sets it up so that timer 0 overflows about every 1/2 second and calls update() when it does. This goes in the setupGame() function.
In update(), I take the direction value from the buffer and assign it for real. I also initialize some "pointers" (not C pointers) that keep track of board locations so the body segments know where they need to move to.
bool first = true;
for(auto body = bodies.begin(); body != bodies.end(); body++) {
	if (first) {
		oldPos[0] = body->x();
		oldPos[1] = body->y();
		body->move(body->x() + dir[0], body->y() + dir[1]);
		newPos[0] = oldPos[0];
		newPos[1] = oldPos[1];

		first = false;
		continue;
	}
	oldPos[0] = body->x();
	oldPos[1] = body->y();

	body->move(newPos[0], newPos[1]);

	newPos[0] = oldPos[0];
	newPos[1] = oldPos[1];
}
The first item in the bodies list is the head, and is special since it moves based on the direction. The rest of the segments play follow the leader. This algorithm works really well when new segments are added to the back of the snake. When the last segment and the new last segment are overlapping, the new segment will just stay put for 1 cycle.
One hiccup I encountered while writing this was that I tried to use
for (auto body : bodies)
This resulted in weird behavior where the segments' boardPos array was not updating. After a day of bug-hunting I switched to the more traditional for loop just to see if anything changed and it did!
Next was the food-eating functionality. If the food location matches the bodies.front() location, bodies.emplace_back() is called to make a new body segment at the end of the snake. Then food.move() is called to move the food to a new, random location.

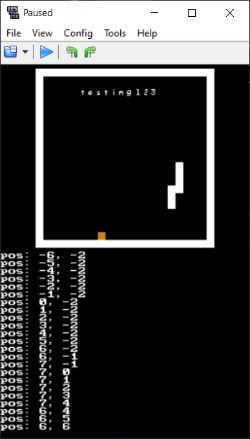
A new bug was revealed: the grid does not line up with the background. I did the math wrong when making the square, resulting in a 20x20 board rather than a 21x21 board. I fixed this, ran the new image through grit, and everything lined up nicely.
The DS and libnds have no concept of text or a font other than the debug console. nflib has some functions for handling fonts and text, but there's not much documentation for how to create a font. Luckily, the old nflib version I still have came with grit and a .bat files for processing fonts. I just used this instead of messing around with "learning". The flags for grit are:
grit.exe my-font-sheet.bmp -g -gTFF00FF -mR! -p -ftb
To get the font sheet, I pulled the one from the nflib documentation. This is a 256x256 pixel image that grit will slice up and turn into a .fnt and .pal file. In the program, nflib has functions that will load these and make displaying text relatively easy. Relative is an important word here as this is more complicated than any other language/framework I've used, but at least I didn't have to create sprites to represent each character.
After some trial and error, I found out that the nflib function for placing text does use screen x/y coordinates, but a different scale than pixels. Moving down 1 text-unit is about 16 pixels, so I adjusted accordingly.
I wanted to get a 16x16 pixel one working so the text would be more visible. This translates to a 512x512 "font sheet" that needs to get feed through grit. This didn't work.
I couldn't figure out what was wrong, so I went looking for examples that used a size 16 font that had source code. I was looking for the grit settings to use, along with a code example. Upon initial inspection of the grit flags such a project used, the issue may lie with nflib. nflib has 2 functions for fonts: load_font() and load_8x16(). Since the library has a separate function for a different size and no function for 16x16, I figured I was out of luck. Looking at the creator's page for the library, it does specify that it only supports 8x8 and 8x16 fonts.
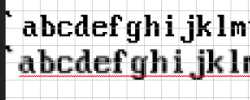
With this new information, I searched for an 8x16 font. I came across the IBM 8x16 font and started making a sheet for it. I had to install the font on my computer and then opened up my photo editing program, Affinity Photo. I typed out the characters shown in the nflib font sheet, but the spacing of the characters didn't line up with the 8x16 slots. They also didn't even line up with pixels, resulting in aliasing and blurring. Unfortunately I couldn't figure out how to fix the spacing, so I made individual text boxes for each character.
I've included the project file here if you want to make your own font.
The grit flags stay the same as the 8x8 font. With the font files prepped, I had to setup the system and create a font layer for use:
// setup text
NF_InitTextSys(SCREEN);
NF_LoadTextFont16("font-sheet", "ibm-vga", 256, 512, 0);
NF_CreateTextLayer16(SCREEN, 0, 0, "ibm-vga");
SCREEN is just 0 or 1, but I made it a constant to make the nflib functions easier to read. The "font-sheet" is the file name of what grit produces. The nitrofiles folder should have 2 files in it: font-sheet.fnt and font-sheet.pal. You can name these whatever you want as longs as they have the same name and are in the same folder.
I inserted the following code when a game starts:
NF_ClearTextLayer16(SCREEN, 0);
NF_UpdateTextLayers();
and when the player dies:
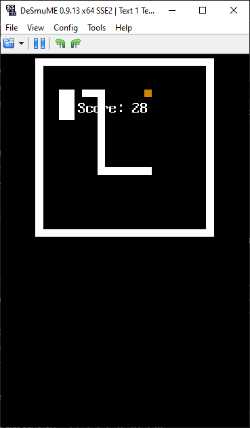
char score[10];
sprintf(score, "Score: %i", bodies.size());
NF_WriteText16(SCREEN, 0, 10, 3, score);
NF_UpdateTextLayers();
Using a char[] to hold the text is necessary if you want to apply formatting, otherwise, you can pass a regular string.
Stopping the game is a simple as calling timerStop(0). I run the code above to display the score, and set a variable called allorReset to true. This lets the "A" button trigger the setupGame() function which essentially starts everything over again.
One bug that came up was that sprites for additional body segments would stay in their place until their spriteID was overwritten by a new body segment. I added a destructor function to the BodySegment class to delete the sprite when the object gets destroyed:
~BodySegment() {
	NF_DeleteSprite(SCREEN, id);
}
With this, the game-over handler is done. The last thing to do is make the snake speed up as more food gets eaten.
The code checks how long the snake is whenever it eats food. If this value matches some predefined lengths stored in an array (e.g. [1, 3, 6, 9, 15, 20, ...]) then the variable called "difficulty" is incremented. Difficulty is then used as an index for another array that is used to step through faster and faster timers:
int timerVals[] = {2, 3, 4, 6, 8, 10, 13};
int difficultyThresh[] = {2, 4, 8, 16, 32, 64, 128};
int difficulty = 0;
When food gets eaten:
if (bodies.size() > difficultyThresh[difficulty]) {
	difficulty++;
	timerStop(0);
	timerStart(0, ClockDivider_1024, TIMER_FREQ_1024(timerVals[difficulty]), update);
}
Unfortunately, the TIMER_FREQ() functions don't work with floats since they are implemented with bit-shifts. For the 1024 version, the function is -BUS_CLOCK>>10 / n, where n is the argument. Bit shifting a binary number to the right is the same as dividing it by 2 for each bit shift. If you are going to the left, it becomes multiplying. So I can rewrite this function to handle floats:
(33513982/2^10) / n;
and since the BUS_CLOCK is constant in my case, I'll just pre-calculate the numerator:
int timerFreq1024(n) {
	return -(int) 32728.498 / n;
}
After running a few values through and comparing to the libnds function, my math is pretty much spot on for once. I also noticed libnds truncates the result, so I'll do the same to be as close to the original as possible. I ran the 2 functions together to check for accuracy and they produce the same results, except when my function returns correct values for floats.
When I switched the code over to using my function, all the speeds seemed way off. I switched back and forth and did more tests, but couldn't figure out what changed. Maybe I've just been playing too much snake. Anyway, with this change, I playtested several times to get the speedup curve feeling good.
The last bug before calling it done was the srand(time(NULL)) not changing when the player restarts. This resulted in each round having the food in the same place, until the system/emulator was restarted. I'm not sure if this is a libnds or desmume problem. To work around it, I added a round counter variable that increments each time the player dies and gets added to the srand() call.
This project was a challenge since there are not many resources to answer questions. Reading the documentation for everything was critical. Using the nflib text system and libnds timer functions were the 2 biggest challenges I encountered, so hopefully I've produced some decent documentation on how to use them.
If you have questions or want to share work, email me, leave a comment, or hit me up on mastodon: c.im/@akbatten.
devKitPro/libnds
nflib
Beginner Tutorial
grit documentation
libnds documentation
nflib documentation
IBM VGA 8x16 font sheet
Font Sheet - Affinity Photo project file
Krita Palette for my 6-7-6 palette
gba temp thread with nds dev resources
