Programming a Nintendo DS (experiment)
14 September 2020
This page is somewhat rambling. It talks about a few libraries, tools, and processes for building a program for the Nintendo DS. I've made an actual game (snake) and covered its development far more coherently here.
I've had a Nintendo DS (nds or ds) for a while; mainly for nostalgia. However, I recently came across the home-brew community for it. People have developed tools for compiling C/C++ into a ROM file that can be played on a DS emulator. With the help of a flashcart (short for flash-cartridge), these ROMs can also be played on a physical device. After looking into devkitARM, libnds, and NightFox lib (NFlib), I decided to take on the challenge of learning to program an old handheld console.
The devkitARM installer includes the compiler and the libnds library. NFlib is another library that abstracts the DS hardware even further. Technically libnds is all you need to work with the DS, but NFlib makes the process a lot easier to get into. NFlib also comes with Grit, a tool for converting BMP images into the proper file type for the compiler/linker to package into the ROM. If you aren't using NFlib, I would still recommend picking up the Grit scripts that come with it. Also, the website for NFlib is in Spanish, but the download comes with an English version of the manual.
Neither libnds nor NFlib include any functions for a game loop, scenes, or levels. These libraries only offer abstraction for the DS hardware. This is great if you want to make something that isn't a game, but means there is more work on our end. This means that this project will also be a great exercise in developing a small framework to keep the code organized and efficient.
NFlib abstracts a lot of the memory manipulation away, but we still need a high-level understanding of what it is doing so we know what functions to call and when to call them. The starting point for this is understanding sprites.
The DS along with many older consoles use a sprite system for displaying things. Sprites are stored in memory as a sprite map along with a color palette. Different sprites can use the same palette to save memory space, and we can draw the same sprite several times, using a different palette each time. This can be seen in many RPGs where several enemies are just different colors. Another famous example of this is Super Mario 3, where the clouds and bushes are actually the same sprite but with different colors. For our purposes, we need to be able to load the sprite map and palette into memory and tell the DS how and where to draw the image. First, we must understand how the memory is organized.
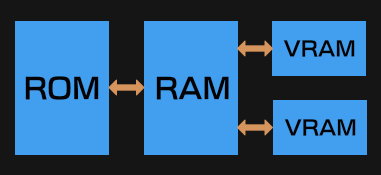
RAM is much like the RAM in your computer. VRAM is very similar, but it is dedicated to graphics operations. Sprite maps and palettes that are being used need to be in VRAM in order for the DS to use them. Everything else like code and variables will stay in RAM. The idea behind these 2 memories is that everything is loaded into RAM at the start and things are only sent to VRAM as needed. We do have the ability to change what sprites are in RAM. This will be useful on level changes, new areas, etc. With NFlib, RAM can hold 256 sprites/64 palettes and VRAM can hold 127 sprites/16 palettes
Part of telling the DS where to draw the image is specify which screen we want. This is important as the DS has two graphics engines, one for each screen (it has more for 3D stuff, but that comes later). Within each screen/engine, each sprite has an ID number. This can get confusing since we now have 4 ID numbers that all refer to different things: screen, sprite, sprite map, and palette. In NFlib, the function arguments will ask for things like the "sprite map". What it really wants is the sprite map ID number. We aren't actually passing around objects or anything.
Note that after creating a sprite, we no longer need the map ID or palette ID to reference it. It's still a good idea to keep track of these though, say, if we need to delete all sprites that use the "enemy" sprite map or something like that.
In order to use an image, we need to save it as a .bmp, run it through grit, and move the resulting files to our project folder. Make sure the the files are saved with the right bit depth. Sprites and backgrounds can be 8-bit (256 color), or 16. I have not used a 16-bit image yet, so I can't say what it takes to use them. Also make sure the size is correct. Tiled backgrounds are 256x256 pixels, and sprites must be divisible by 8 in both axes (8x8, 8x16, 32x8, etc.) up to 64 pixels for x and y. There are a couple larger sizes that are not allowed like 64x64
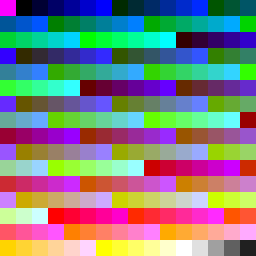
For small projects, having a palette for each sprite could work, but I opted to use a master palette. This is one 8-bit (256 colors) palette that every sprite will use. There are a handful of palettes listed on Wikipedia that I looked at. I chose 6-7-6. This means there are 6 shades of red, 7 of green, and 6 of blue that can be mixed together. This results in 252 colors. This includes black and white, but no greys so I opted to make the remaining 4 shades of pure grey. Also note that color (255, 0, 255) is used where you want the sprite to be invisible. I put all these different colors into a Krita palette and created a 16x16 image with 1 pixel of each color. This will ensure grit generates the master palette correctly.
For whatever reason, the grit .bat files provided with NFlib would not work quite right. After experimenting, I found the right combination of flags that works for me:
grit.exe <source file(s)> -gt -gB8 -pu16 -pS -ftb -fh! -Omypal.pal -gTFF00FF
I have included my modified .bat file here. However, I recently looked at the nflib github and I saw they removed the grit helper scripts, so I recommend not using this.
The -O flag sets the "shared palette" file name. The included "shared" .bat script will delete this and make a palette named after every source file, but they will all be the same. I renamed one "master_palette.pal" and copied it into the project.
Backgrounds get a different set of flags. Also note that we can still use multiple palettes, I just designed this one to get the most re-use out of it.
With a working knowledge of the DS's graphics engines, we can start to make things display on the screen. The first step is to initialize the graphics engines. This code is all placed in main(). There are a few libraries to include other than this, but NFlib comes with a nice template, so I won't list them out here. If you want to keep your code to a minimum, you can leave 1 screen uninitialized. On a physical DS, it will be white, so I write a few extra lines just to draw a black background, saving my eyes.
// initialize 2D engines for both screens
NF_Set2D(0, 0);
NF_Set2D(1, 0);
We also need to tell NFlib where we placed the art assets. The NITROFS argument indicates that the files are in a folder called "nitrofiles". This folder should be located at the same level as the "source" folder. Sub-directories can be made, but we must specify the file paths in the code relative to this "nitrofiles" folder.
// tell NightFox where resources are (graphics and palettes)
NF_SetRootFolder("NITROFS");
Next, we start up the background buffer and systems. In this case I am loading a "tiled" background, but there are a couple other types that could be used.
NF_InitTiledBgBuffers();
NF_InitTiledBgSys(0);
NF_InitTiledBgSys(1);
Almost there. We load the background from the file while also giving it a identifier that will be used by other functions to reference this image.
NF_LoadTiledBg("backgrounds/blackBackground", "black", 256, 256);
Lastly, the background is created on screen 0.
NF_CreateTiledBg(0, 3, "black");
With all this, we should be able to build a .nds file with NFlib, load it up, and stare at the blank screen we've created.
To make something interesting, I prepped a sprite with grit. Place the resulting .img and .pal files into the nitrofiles folder, and use the following lines to draw something:
// load sprites into RAM
NF_LoadSpriteGfx("sprites/blue_circle", 0, 32, 32);
NF_LoadSpritePal("sprites/blue_circle", 0);

// move sprite data to VRAM
NF_VramSpriteGfx(0, 0, 0, true);
NF_VramSpritePal(0, 0, 0);

NF_CreateSprite(0, 0, 0, 0, SCREEN_MID_X, SCREEN_MID_Y);
All these 0s are confusing. They are all either screen number, gfx ID, or palette ID. I recommend referring to the nflib documentation to be sure.
To actually update what is on screen, we need to update the OAM. All our code really takes effect on a sort of buffer, and we need to copy this buffer to the actual memory used to draw on the screen in between frames.
// copy NitroFox OAM into libnds OAM (neither is the real OAM)
NF_SpriteOamSet(0);
NF_SpriteOamSet(1);
// copy libnds OAM into the actual OAM. must be done during VBlank
swiWaitForVBlank();
oamUpdate(&oamMain);
oamUpdate(&oamSub);
My 6-7-6 palette for Krita
nflib English Documentation
Forum thread about programming
Technical specs and guide
grit documentation
Wingrit documentation - GUI for grit, can only process 1 file at a time