Migrating from AWS to Local Servers
23 Apr 24
Overview
Hardware
Connecting the Subnet
SearXNG
Webserver
SSH Access
Final Thoughts
Resources
AWS made a change where static IPs cost money, resulting in my monthly costs doubling. This made me want to set up a network at home with some spare Raspberry Pis and a tiny workstation computer to host my website and other webservers. Being in an apartment with community WiFi, I had to get creative since I cant just plug in a switch and open some ports. I found Cloudflare Tunnels, which solve my port-opening problem. For the local network setup, I wanted to use a home router's wireless to connect to the apartment wifi and use that as the "WAN"/default gateway. Turns out the router I bought can't do that, so I had to use a Raspberry Pi to close the link. Since this configuration actually has the RPi act as a router with DHCP and DNS, I could have gotten a switch instead of the full router.
I already owned a RPi 3, RPi 4, and a LePotato SBC. I bought a Linksys EA7500 router hoping the "wireless bridge" feature would work for me. Unfortunately it doesn't do exactly what I thought it did. I also bought a ThinkCentre M93p off ebay that had 128GB of SSD space and 8GB of RAM. This is significantly more powerful that the EC2 instance that my website was running on, so I'll have plenty of resources for projects in the future. I made a list of what I wanted to migrate and which computer it would move to:
RPi4 - WiFi/WAN adapter
RPi3 - SearXNG
M93p - Website
LePotato - ?
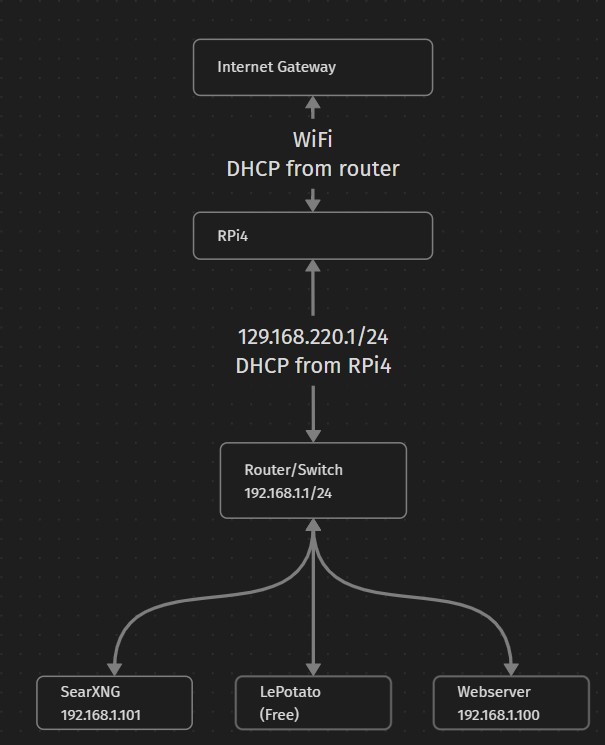
The computers are simply connected to the ethernet ports on the router except for the RPi4, which I left aside for setup.
I started by flashing the RPi4 with RaspbianOS and enabling SSH. I plugged it into a LAN port on the router and plugged my laptop into another LAN port. I followed this tutorial to setup my WiFI/WAN connection. I had to use raspi-config to set up the WiFi connection. The other problem is that Raspbian comes with the network-manager package instead of dhcpd. So instead of configuring /etc/dhcpd.conf, I started the network-manager gui with 'nmgui' and changed the matching settings in there. Once everything looked good, I turned it off, moved it to the WAN port, and powered it up. I could check with the laptop if the sebnet had Internet access. Here's a summary of the steps I took:
# connect to WiFi however you want
$> sudo apt install iptables dnsmasq
# set the ip address on the ethernet interface to 192.168.220.1/24, nmgui has a graphical way of doing this
In /etc/dnsmasq.conf, place the following to set up the DHCP server:
interface=eth0
listen-address=192.168.220.1
bind-interfaces
server=8.8.8.8
domain-needed
bogus-priv
dhcp-range=192.168.220.50,192.168.220.150,12h
In /etc/sysctl.conf, find and uncomment the following line:
#net.ipv4.ip_forward=1
Load the change:
sudo sh -c "echo 1 > /proc/sys/net/ipv4/ip_forward"
Make some firewall/routing rules and save them:
sudo iptables -t nat -A POSTROUTING -o wlan0 -j MASQUERADE
sudo iptables -A FORWARD -i wlan0 -o eth0 -m state --state RELATED,ESTABLISHED -j ACCEPT
sudo iptables -A FORWARD -i eth0 -o wlan0 -j ACCEPT

sudo sh -c "iptables-save > /etc/iptables.ipv4.nat"
And finally, in /etc/rc.local, place the following line right before the last "exit 0":
iptables-restore < /etc/iptables.ipv4.nat
I started the dnsmasq service with 'sudo service dnsmasq start', turned off the RPi, switched it over to the WAN port on the router, and powered it up.
This turns the RPi into a basic router. It can provide DNS if we set that up, along with DHCP that it is currently providing. But having the router behind it creates another subnet. If I used a switch, this setup would be a lot cleaner. Regardless, I can use the router's admin page for these things too.
The SearXNG instance was simple enough I decided to just make a fresh one. I flashed the RPi3 with RaspbianOS again and installed SearXNG using their installation script. I also used it to install nginx as the server. I copied over the nginx config from the old machine along with the /etc/letsencrypt folder. This folder contains the SSL certificates. It has a directory called 'live' which contains the live certificates. These are actually sym-links or soft-links to the actual certificates in an 'archive' folder. The 'cp' command, by default, follows symlinks, meaning in the copy, the actual files will be in the 'live' folder. This causes errors with certbot since it checks if they are symlinks or not. I replaced these files manually to match the old configuration.
Next, I had to set up the Cloudflare tunnel so I could access the server outside of the tiny subnet. I followed the official cloudflare documentation and created a tunnel through their web-gui. Copy-pasting commands worked fine. To add a DNS entry that points to this tunnel, I first renamed the old SearXNG DNS entry. On the tunnel's public hostname tab, I put the URL I wanted to my SearXNG instance, HTTPS for the protocol, and localhost for the destination. The one issue was with the tunnel setting for 'TLS verify'. This is on by default. LetsEncrypt/certbot SSL certificates seemingly do not pass this verification, so HTTPS only worked after turning this off.
With that, the new instance was ready to use. For some reason, SearXNG would receive timeouts from every search engine for a few hours. The next day though, everything worked fine with no changes. I deleted the old DNS entries and the old AWS EC2 instance to finish cleaning up.
For the website, I wanted to copy the server as much as possible. I attempted imaging the disk and restoring from that, but after a single attempt I didn't want to troubleshoot. All the configs I wanted to copy where in /etc/nginx, /etc/letsencrypt, my home folder, and some MySQL databases. I also wanted to copy the nginx install, which I compiled with a plug-in for RTMP - a protocol for live-streaming media. 'nginx -V' prints out the flags used at compile-time, so I copied those to the new machine and compiled. Some paths in there were for the old version, so those were updated along with removing the --Wdate-time flag (it was causing errors).
With some help from StackOverflow and a tool called Percona toolkit, I exported the MySQL database of users and their permissions into a file that I could import into the new MySQL server. These gave me a lot of trouble until I realized I needed to run commands with sudo.
MYSQL_CONN="-uroot -p"
pt-show-grants ${MYSQL_CONN} > MySQLUserGrants.sql

# on the new server:
mysql -uroot -p -A < MySQLUserGrants.sql
I also exported the comment database using the phpmyadmin interface and imported it using the same. The new phpmyadmin was giving some odd errors that didn't seem to affect usage. I ended up adding the CREATE permission to my user account to fix them. I installed the FreshRSS instance from scratch and just imported my feed list from the old one.
Configuring the Cloudflare tunnel went the same way as with the SearXNG server. Everything was tested and the old web-server shutdown.
I initially planned to set up an OpenVPN server in the network, but doing a little research into other solutions revealed that using SSH over a Cloudflare tunnel is pretty easy. There a 2 things to set up: a new public host-name and a "Cloudflare application". The additional public host-name is a different URL and tells the tunnel to route traffic to ssh://localhost:22 on the target machine. One thing I learned here is to keep domain names short: having something like search.ssh.akbatten.com messes with the SSL certificates and things break.

In Cloudflare > Zero Trust > Access > Applications, I made 2 new applications for the 2 servers. The name is up to you and the "application domain" should match the sub-domain that was added to the tunnel. The policy menu adds a layer of access control before the ssh login screen. I chose email, so it sends me a code before showing the ssh login screen. To finish up, in the last "settings" screen, at the bottom, I picked SSH on the "browser rendering" setting. I also checked "enable automatic cloudflared authentication" so I don't have to keep copying one-time-codes if I already logged in once.
I can now enter the special SSH URL in any browser, log in to get through the Cloudflare screen, then log in with SSH credentials for the server.
Having these servers run on local hardware in my apartment gives up quite a bit of network speed and uptime guarantees. If the power goes out, the website goes down. But on the other hand, the servers have significantly more RAM and CPU power. The only ongoing cost is electricity, which is marginal for these low-power computers. I'm not paying for AWS IP addresses, EC2 instances, or storage. The new setup is overall cheaper and more flexibility at the cost of some reliability. For my NextCloud instance though, I want the reliability. If I'm traveling and the apartment loses power, I still want access to my cloud. If the apartment catches fire, I need to keep the NextCloud instance up since my other backups will probably be destroyed.
Cloudflare Docs - Tunnel
Cloudflare Docs - SSH Tunnel
