Self-Hosted LLM Deployment
16 Nov 24
I recently came across the local large language model scene and I wanted to set up a self-hosted LLM system that is accessible from the web. Open-WebUI seems to be a popular and well supported open-source front end. Unlike many other LLM front-ends, it supports accounts for different users. It is designed to work with ollama as the back-end. Open-WebUI provides the user interface (as its name implies) and ollama is responsible for loading and running the models. I bought a Lenovo P320 tiny to run ollama and Open-WebUI will be installed on my existing webserver machine. The P320 has a Quadro P600 GPU, which only has 2GB of VRAM. ollama will also use regular RAM (of which I have 8GB) so I'm limited to small models.
After installing Ubuntu server on the computer, I hooked it up to my network and gave it a static IP. I initially started installing ollama as a docker container, but I was getting issues related to the GPU. After about an hour of troubleshooting and searching online, I got the following steps to work (taken from the NVIDIA website):
wget https://developer.download.nvidia.com/compute/cuda/repos/ubuntu2404/x86_64/cuda-ubuntu2404.pin
sudo mv cuda-ubuntu2404.pin /etc/apt/preferences.d/cuda-repository-pin-600
wget https://developer.download.nvidia.com/compute/cuda/12.6.2/local_installers/cuda-repo-ubuntu2404-12-6-local_12.6.2-560.35.03-1_amd64.deb
sudo dpkg -i cuda-repo-ubuntu2404-12-6-local_12.6.2-560.35.03-1_amd64.deb
sudo cp /var/cuda-repo-ubuntu2404-12-6-local/cuda-*-keyring.gpg /usr/share/keyrings/
sudo apt-get update
sudo apt-get -y install cuda-toolkit-12-6
sudo apt-get install -y cuda-drivers
Note that these commands are specific to Ubuntu 24.04 on an x86_64 system. With this all done, I double checked the drivers were working:
sudo nvidia-smi
Now we can install ollama, which, if you're not using it as a docker container, is a simple command:
curl -fsSL https://ollama.com/install.sh | sh
I have docker installed and running on my webserver, so setting up Open-WebUI was pretty straightforward. Their GitHub is well documented. I used the following docker command to get up and running:
docker run -d --network=host -e OLLAMA_BASE_URL=http://example.com -v open-webui:/app/backend/data --name open-webui --restart always ghcr.io/open-webui/open-webui:main
OLLAMA_BASE_RUL should be set to the IP of the ollama server. Interestingly, the command listed in their GitHub uses https instead of http, which caused problems for me. I also had to change the network setup, making it "host" instead of the port mapping that docker does by default. With this running, I opened a web browser and typed in the IP of the webserver, also specifying the port that Open-WebUI is listening to (8080 by default).

On a fresh Open-WebUI deployment, the first account that gets registered is the admin. Once logged in, I went to the administrator panel/settings and verified the connection to ollama was working. The next step was to download a model. My primary interest is tech-support/programming help so I browser ollama's library for a model with "code" in the name that were small enough to fit in my RAM-limited environment.
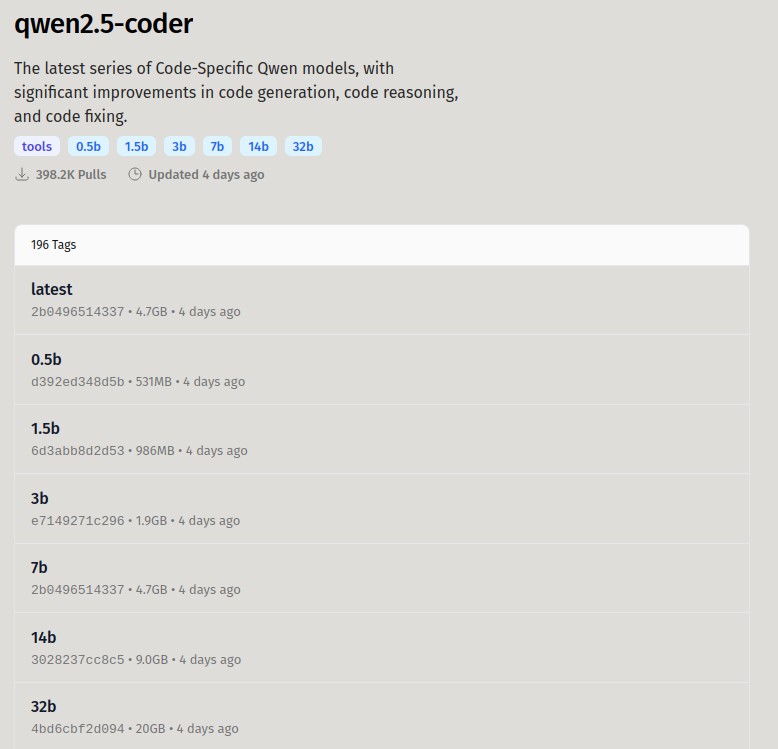
ollama has a large library of models that you it can download automatically. Models are listed by family, such as "qwen2.5-coder". Clicking on a family shows more information and also has a drop-down that lists the specific models. Clicking "show more" brings you to every model in the family, which often includes "quantized" models. Since I have a memory-limited system, I will most likely need a quantized model (unless the regular one is small enough). The listings include a size, which indicates how much memory they will need.

I'm not exactly sure what all the numbers mean, but the Q with numbers after it indicate something about the level of quantization. I just picked ones that was close to the original model size (7b), but still fit in within my RAM limitations.
To get ollama to download the model, we can family:model-name string from ollama's website and past it into Open-WebUI's admin console. After the download finishes, it's ready to go. I set up nginx as a reverse proxy and added an entry in DNS so I can access the LLM from outside my network and also so I don't have to specify the port.

