Budget Bird Buddy
23 May 2023
My wife told me about the BirdBuddy. $200 seemed a little pricey for a bird feeder with a camera on it, so I decided to try and make my own that only does pictures. I've also seen other feeders with cameras on Amazon that are probably cheaper, but haven't looked into reviews or specs.
We need a bird feeder, camera module, a server to hold all the images, and a method for getting the pictures onto the server.
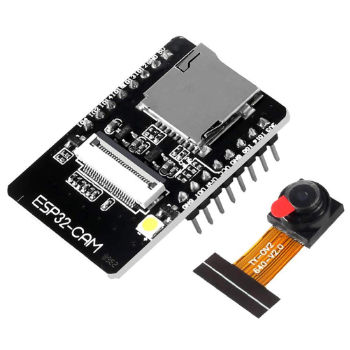
The ESP32-cam is an Arduino-like microcontroller that features WiFi and a camera module. ESP32 is the base chip that offers WiFi and the Arduino ease-of-use. Most often these boards seem to come with an OV2640 camera, with a lens that gives a 52° field-of-view (FOV). Because the birds will be too close for that FOV, I also got some OV2640s with 140° lenses.
The bird feeder is 3D printed in PLA. It's a basic tray with 2 columns/silos for holding more food on the back. In-between these columns is a spot for the ESP32-cam. The camera will be in its own housing with power from a USB cable, and a metallic strip attached to the "landing-rail" in front of the feeder tray. When a bird (or squirrel) touches this strip, the ESP32-cam will start taking pictures.
This tutorial covers just about everything needed for the camera system and server setup.
The last note is that I put all the pages related to this behind nginx's authorization protection. You need an account to get to any of these pages. I don't want random people seeing pictures of my backyard or flooding my server with files.
The previously mentioned tutorial covers a gallery page. I used the concept of this, but went with my own layout and PHP code:
$dir = './photos/*.jpg';
$fileList = array();
$fileList = glob($dir);

usort($fileList, function($x, $y) {
	return filemtime($x) < filemtime($y);
});

echo("<div class=\"flex-container\">");
foreach($fileList as $file) {
	// echo the HTML around each photo
}
This code iterates through each file in the folder, indicated by the $dir variable. The "usort" block sorts the file list so that the newest photos get printed first, and thus at the top of the page. In the "foreach" loop, you can put whatever HTML you want to go with each image. The simplest solution would be a single img tag (see below), but you can dress it up however you like. Also keep in mind that this is PHP code "echo"ing HTML so we need to escape certain key-characters/reserved characters like quotes.
<img src="'.$file.'" style="width: 100%">
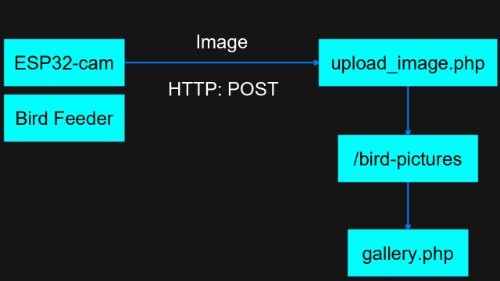
The camera module will use an HTTP POST request to upload photos to the server, so we need to make a page that can handle receiving this request and saving the file. I suppose we could add the PHP code to the same page, but I went with making a seperate page as in the tutorial. Other than changing file paths and making error messages more detailed, the only thing I changed was the first verification check. The tutorial has:
if(isset($_POST["submit"])) { ...
This requires that POST request has a field called "submit" and that it is set to something. While this makes sense for a human-filled form where somebody will click a submit button, it doesn't make much sense for an automated system. I replaced that line with:
if($_SERVER['REQUEST_METHOD'] === 'POST') { ...
This simply checks if the HTTP request is a POST request. Other types such as GET or PUT won't get by. With the viewer and the saver created, we just need something to take photos and send them.
The camera module is an ESP32-cam with a metallic-strip on the bird landing rail/perch to act as the trigger. I used the code from the previous tutorial with some modifications to the trigger mechanism. I also added an authorization header to the HTTP request. In the esp32 code, the tutorial has:
client.println("POST " + serverPath + " HTTP/1.1");
client.println("Host: " + serverName);
These are a few headers; adding an authorization header is as simple as adding the following below those lines:
client.println("Authorization: Basic " + authString);
The HTTP Basic authorization scheme dictates that the word "Basic" is followed by "username:password", encoded in base64. Keep in mind that base64 is not encryption and anybody can reverse the encoding, so don't save the base64 version somewhere unsafe.
With these mods, I hooked up the esp32-cam and a button for the trigger to test.
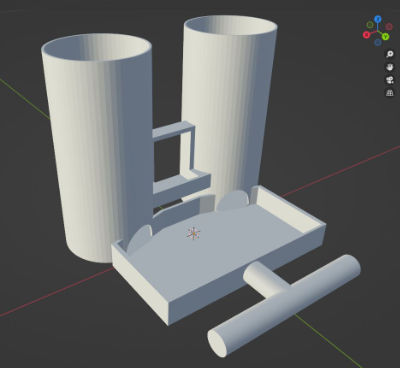
I modeled the bird feeder in Blender to be 3D printed. The thing I had to keep in mind was simplicity. The way the actual Bird Buddy has 1 large hopper for the food with the camera module inserted in the middle would be tougher to print and design for. I eventually settled on 2 columns or silos that feed into a tray. The camera module sits in the middle. There's a rail or perch sticking out of the front to hopefully get birds landing there and framed nicely.
I'm new to Blender so perhaps my approach was naive, but I used basic shapes and booleans to build up the model. The most complex section was the 2 silos. The bottom is sloped towards the door to help the seeds move out. I started by making a cylinder that represents the empty space inside the silo. I chopped off the bottom at an angle using a cube and the boolean modifier. I then used the negative space shape with a boolean to get the actual shape of the silo.
I continued to use basic shapes, booleans, and some simple moving of vertices to make the full bird feeder. I also made a cube to represent the camera module for reference.
With all the components complete, I soldered some pins to perfboard and inserted the esp32 and connected the copper-tape on the perch. When modeling the bird-feeder, I used the camera module reference to make the holder. This locked me into a size for the camera module case, so I had to keep that in mind while assembling the camera module.
Testing revealed that the module .
